Since the time when a number of ARM sub-architectures are entering the ground, it's been a big headache to the maintainers of the Linux source as there were huge number of duplicates to support specific sub-architecture and board configurations making the Linux Mainline so big and clumsy. To avoid this, the team came up with an idea to keep the board specific files away from the Kernel mainline and thus the birth of Device Tree Source (.dts) files which will be compiled as separate binary, Device Tree Blob (.dtb). With device tree, it is possible to use a single kernel image on different boards using the same SoC by simply passing a different device tree containing board specific data structure.. When booting, it is the boot-loader which passes this device tree to the kernel. At present, it is made mandatory to have Device Tree. More story about device tree can be found at xillybus.com, elinux.org, freebsd.org and more. Also check this document.

All Engineering study materials
Showing posts with label Embedded Linux. Show all posts
Showing posts with label Embedded Linux. Show all posts
June 01, 2016
March 18, 2016
Bringing Wi-Fi Access Point Feature on your embedded board running GNU/Linux
Before reading through this article, to build and install GNU/Linux on embedded board, read through this link.
To bring WiFi client feature on your embedded board, read through this link.
----
Follow these simple steps below to bring your board as AP.
To bring WiFi client feature on your embedded board, read through this link.
----
Follow these simple steps below to bring your board as AP.
-
Install necessary tools
Install hostapd and dnsmasq necessary for an Access Point.# apt-get install hostapd dnsmasq --no-install-recommends -
Configure network interface
Add or modify /etc/network/interface to contain the following.# cat /etc/network/interface auto lo wlan0 iface lo inet loopback allow-hotplug eth0 iface eth0 inet dhcp iface wlan0 inet static address 192.168.1.1 network 192.168.1.0 netmask 255.255.255.0 allow-hotplug wlan0The above file says how our system get connected through eth0, wlan0 and lo. Check man page of interfaces for more details. -
Configure hostapd
# cat /etc/default/hostapd
DAEMON_CONF="/etc/hostapd/hostapd.conf"
DAEMON_OPTS="-dd"
# cat /etc/hostapd/hostapd.conf interface=wlan0 driver=nl80211 ssid=zilogic channel=1 -
Configure dnsmasq with Client IP range
# cat /etc/dnsmasq.conf interface=wlan0 dhcp-range=192.168.1.10,192.168.1.100,12h dhcp-option=3,192.168.1.1 -
Start hostapd and dnsmasq services.
# service hostapd start
# service dnsmasq start
Note: Now, you can try Raspberry Pi 3 that comes with WiFi and Bluetooth on-board for IoT applications.
More Reading
-
What is the significance of firmware-atheros package?
-
What is the significance of wireless-tools utility?
-
What is iw and iwconfig? How do they differ?
-
What is wpa_supplicant? How to connect to an encrypted connection?
-
What is Wireless Extensions(WE)?
-
What are nl80211 and cfg80211 and how do they differ from WE?
- What is Bridging in network connections?
Bringing Wi-Fi Client Feature on your Embedded board running GNU/Linux
To prepare your embedded board with GNU/Linux running on it, read through this link.
To bring Wi-Fi Access Point feature, read through this link.
----
To bring Wi-Fi client feature with the given NIC on your Embedded board running Linux, we may need
To bring Wi-Fi Access Point feature, read through this link.
----
To bring Wi-Fi client feature with the given NIC on your Embedded board running Linux, we may need
-
Device driver for the given NIC enabled in the Kernel.
- Some HAL layer firmware, if required by the device driver. (Ref. ath9k_htc firmware - github.com)
-
Certain utilities to configure and manage Wi-Fi.
(iw, ip, iwconfig, wpa_passphrase, wpa_supplicant, firmware-atheros)
Installing custom packages
You may require some software utilities like, iwconfig, iw, etc., which may be required to solve your purpose. To install them there are the following possibilities.
-
Download .deb packages of required utilities to a USB Stick or to the SD Card and install them using dpkg with -i
option. But, we have to know all the dependencies for evey package you
install and have them downloaded and installed prior to installing the
main package.
-
Include the packages while building the rootfs.
-
Connect to internet through any possible interface available (ethernet, wlan) and using apt-get install them from your favorite repository. But, your board should have any such interface enabled and available for use.
-
Use chroot on your host Linux System to change from the host’s rootfs to the SD Cards rootfs/(target fs). This method is followed in this case.
Installing custom packages using chroot
- This requires super user access. VirtualBox together with Vagrant can be used to get super user access by normal user.
-
Also, chroot will work only if the target architecture is same as that of the host.
-
When configuring kernel during compilation, enable support for ath9k_htc under device drivers in menuconfig. ath9k_htc is a device driver specific to atheros AR9271 which is the chipset used in our given NIC (TP-Link TL-WN722N).
-
qemu-arm-static is a binary that can be installed in host and
copied to target file system. This is used as an interpreter to run arm
binaries of target file system(SD Card rootfs/). This will fix the
architecture issue while using chroot.
$ sudo apt-get install binfmt-support qemu-user-static
$ cp /usr/bin/qemu-arm-static /home/user/rootfs/usr/bin
Here, SD Card is mounted at /home/user/. The option binfmt-support says the binfmt_misc kernel module to use qemu-arm-static as the interpreter to execute arm binaries. -
Mount proc/ and sys/
$ cd rootfs $ sudo mount -t proc none proc/ $ sudo mount -t sysfs sysfs sys/ $ sudo mount -o bind /dev dev/ -
Change rootfs
(need to be super user to do this)
$ sudo chroot rootfs/ root@emdebian:/# -
Update list and install packages (firmware-atheros, wireless-tools, wpasupplicant, wireless-tools, iw, kmod) and then exit and unmount proc, sys and dev. firmware-atheros is required for our case but not mandatory for all the atheros devices[3].
# apt-get update
# apt-get install firmware-atheros wpasupplicant wireless-tools iw kmod
# exit
$ unmount /rootfs/proc/
$ unmount /rootfs/sys/
Unmount the SD Card from the PC and connect to the board and boot it. In SAMA5D3_Xplained board, a dedicated DEBUG console is provided which can be used to connect to system terminal through a USB-Serial converter. After the system boots up and logged in, plug the NIC in the USB port. The device should be automatically detected and will be ready to use. -
Enable wlan0
# ifconfig           /* To check if wlan inteface is listed */
# ifconfig wlan0 up
The second command will enable the default WLAN interface wlan0. Now the interface will be up and ready to use.
-
When configuring kernel during compilation, enable support for ath9k_htc under device drivers in menuconfig. ath9k_htc is a device driver specific to atheros AR9271 which is the chipset used in our given NIC (TP-Link TL-WN722N).
Connecting to an open network as Client
-
Connecting to an open network is simple. It can be achieved using the iwconfig utility.
# iwconfig dev wlan0 connect <SSID>You can also try iw. -
Get IP assigned from AP
# dhclient wlan0You can check -r option for dhclient to release the current IP lease when necessary.
More Reading
-
What is the significance of firmware-atheros package?
-
What is the significance of wireless-tools utility?
-
What is iw and iwconfig? How do they differ?
-
What is wpa_supplicant[4]? How to connect to an encrypted connection?
-
What is Wireless Extensions(WE)?
-
What are nl80211 and cfg80211 and how do they differ from WE?
-
What is Bridging in network connections?
Build and Install Linux for ARM Cortex-A5 based embedded board
For this present article, we use SAMA5d3_Xplained board based on ATSAMA5D36 (ARM based MPU). But, the same step follows for any other hardware.
This article aims to introduce on bringing up SAMA5D3_Xplained board as a Linux System.
Before we start, we need to understand the boot sequence to know what should be done (Ref. Getting Started - at91.com)
The above image will show you three levels of bootloaders which are optional based on whether we implement simple firmware or OS.
Step:1 Prepare the necessary objects
This article aims to introduce on bringing up SAMA5D3_Xplained board as a Linux System.
Before we start, we need to understand the boot sequence to know what should be done (Ref. Getting Started - at91.com)
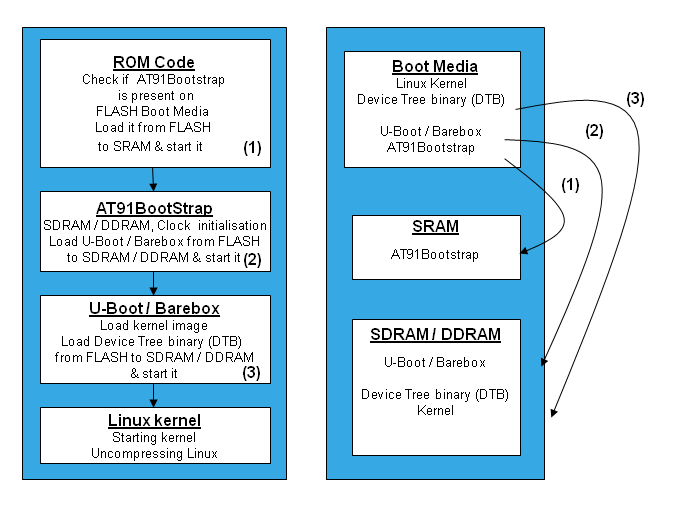 |
| Boot Sequence (Source: at91.com) |
Step:1 Prepare the necessary objects
- Bootstrap image
- Kernel Image
- Kernel modules
- Device tree file
- Rootfs Image
Note:
arm-linux-gnueabi- toolchain required to build the image, can be downloaded form release.linaro.org and add path to gcc-linaro_<version>_arm-linux-gnueabi/bin directory.$ export PATH=~/gcc-linaro-4.9-2014.11-x86_64_arm-linux-gnueabi/bin/:$PATH
To permanently add the path to the environment, add the above command to .bashrc file.
Building Bootstrap Image
-
Clone/Download at91bootstrap source from linux4sam/at91bootstrap git repository.
-
Configure the source with the default configuration for SD Card boot.
You can find a number of default configurations for different boot media
at ./board/sama5d3xek/ directory.
$ cd at91bootstrap/ $ make mrproper $ make sama5d3_xplainedsd_linux_image_dt_defconfigNote:nf- NandFlash, sd - MMC Card, df - SerialFlash, linux - linux kernel, android - android kernel, uboot - u-boot, dt - device tree binary (dtb). (Ref. AT91Bootstrap - at91.com) -
Compile the at91bootstrap
$ make CROSS_COMPILE=arm-linux-gnueabi-The resulting binary will be created at ./binaries/ with the name sama5d3_xplained……bin .
Building Kernel Image, Device Tree (.dtb) and Kernel Modules
The Kernel Image, Device Tree Binary and Kernel Modules are all built form Kernel Source with different options.
-
Get Kernel Source either from kernel.org or linux4sam/linux-ar91 git repository.
-
Configure the build with default configuration.
Note: More default configurations for various standard boards can be found at arch/arm/configs/. Equivalently, you can also copy the desired configuration file from this directory to root directory with file name '.config' and run make defconfig.$ cd linux-at91 $ make ARCH=arm CROSS_COMPILE=arm-linux-gnueabi- sama5_defconfig -
For any changes needed in the configuration, configure using menuconfig
$ make ARCH=arm CROSS_COMPILE=arm-linux-gnueabi- menuconfig -
Compile for Kernel Image
$ make ARCH=arm CROSS_COMPILE=arm-linux-gnueabi- zImage -
Compile for Device Tree Binary(.dtb)
$ make ARCH=arm CROSS_COMPILE=arm-linux-gnueabi- dtbs -
Compile for Kernel Modules
$ make ARCH=arm CROSS_COMPILE=arm-linux-gnueabi- modulesThe images will be created at arch/arm/boot/.
Building Rootfs
There are several Roofs build systems available such as Yocto, Buildroot, Busybox, Multistrap, etc.,
For our convenience, we can get the archived pre-built custom Rootfs from shark/zdrive. Other sources can also be found online(sborut.wordpress.com, Dropbox). But, for ARM architecture.
Preparing SD/MMC Card
In SD Card, two partitions are to be created.
-
First partition (FAT32) ⇒ boot/ ⇒ required to move the boot images(bootstrap, kernel image and device tree binary).
-
Second partition (EXT4) ⇒ rootfs/ ⇒ for the root file system requied by the kernel to run.
Note:
fdisks is a command-line tool for creating and managing partitions. mkfs is another command-line tool to format paritions to required file system. Need to be super user to use this tool.-
After the SD Card is ready with the required partitions say by name, boot and rootfs, copy the bootstrap image, kernel image, dtb to boot/ as follows.
$ at91bootstrap/binaries/sama5d3_xplained-sdcardboot-linux-image-dt-3.8.bin /media/user/boot/boot.bin $ cp linux-at91/arch/arm/boot/zImage /media/user/boot/image $ cp linux-at91/arch/arm/boot/dts/at91-sama5d3_xplained.dtb /media/user/boot/ -
Untar the downloaded rootfs archive to the second partition rootfs
$ tar -xvf rootfs-armel-wheezy.tar.xz -c /media/user/rootfs -
Install the Kernel Modules into rootfs
~/linux-at91 $ make modules_install ARCH=arm CROSS_COMPILE=arm-linux-gnueabi- INSTALL_MOD_PATH=/media/user/rootfsNow, your SD Card is ready with the necessary components to run Linux on SAMA5D3 Xplained board.
Bringing Wi-Fi Client Feature
To bring Wi-Fi client feature with the given NIC, we may need
-
Device driver for the given NIC enabled in the Kernel.
- Some HAL layer firmware, if required by the device driver. (Ref. ath9k_htc firmware - github.com)
-
Certain utilities to configure and manage Wi-Fi.
(iw, ip, iwconfig, wpa_passphrase, wpa_supplicant, firmware-atheros) - Read on through this link to bring WiFi Client feature.
Read on through this link to bring WiFi Access Point feature.
January 30, 2016
Steps to configure NuttX to run a built-in app from NuttX Command Line (Nutt SHell or NSH)
For people who are new to NuttX like me, in a sentence, NuttX is an embedded RTOS. You can read the overview at nuttx.org. If you have tried building NuttX for your favorite board with the example application or your own application, you may be looking to run your application concurrently from NSH (Nutt SHell) as like we do in GNU/Linux Command line. Bringing up such feature is by enabling Built-In application. The following explanation is a digest of my learning from 'NuttX/apps/README.txt' and acassis blog post.
-
To enable built-in app to be available in nsh, edit 'nuttx/configs/<board_name>/nsh/defconfig' and add the below configurations
CONFIG_BUILTIN=y CONFIG_NSH_BUILTIN_APPS=y CONFIG_EXAMPLES_MYAPP=y /* To allow configuring myapp as built-in app */ -
fork 'apps/examples/hello' to 'apps/examples/myapp' and
-
rename 'myapp/hello_main.c' to 'myapp/myapp.c'
-
Edit 'myapp/mayapp.c' and change 'hello_main()' to 'myapp_main()'
-
modify 'myapp/Kconfig' to resemble the following code to reflect your application name
config EXAMPLES_MYAPP bool "\"Myapp Hello, World!\" example" default n ---help--- Enable the \"Myapp Hello, World!\" example if EXAMPLES_MYAPP config EXAMPLES_MYAPP_PROGNAME string "Myapp Program name" default "myapp" depends on BUILD_KERNEL ---help--- This is the name of the program that will be use when the NSH ELF program is installed. endif -
modify 'myapp/Makefile' with the following to reflect your application name.
APPNAME         = myapp
CSRCS           = myapp.c
Note: The 'APPNAME' above should reflect the prefix in myapp_main() and this is the same name by which your NSH command line app will be. -
modify 'myapp/Make.defs' to reflect the following code
ifeq ($(CONFIG_EXAMPLES_MYAPP),y) CONFIGURED_APPS += examples/myapp endif-
check 'apps/examples/Make.defs' for
include $(wildcard examples/*/Make.defs)if its not present, add it. This makes 'Make.defs' file in every examples subdirectory to be added when configuring. (In otherways, the 'myapp/Make.defs' can be omitted and its contents can be copied to this 'Make.defs' file.)
-
check 'apps/examples/Make.defs' for
-
rename 'myapp/hello_main.c' to 'myapp/myapp.c'
-
In 'apps/examples/Kconfig' file, include
source "$APPSDIR/examples/myapp/Kconfig" -
fork 'nuttx/configs/hello' to 'nuttx/configs/myapp' and modify 'myapp/defconfig' to add
CONFIG_EXAMPLES_MYAPP=yand comment all other examples if enabled. Say,# CONFIG_EXAMPLES_HELLO is not set -
At this point, everything is set and ready if you are not using any
hardware peripheral such as UART, SPI, I2C, CAN, etc. You can jump to
the next step. If you are accessing any hardware peripheral, then you
need to set the corresponding configuration macros as true. You can do
that in 'nuttx/config/<board_name>/myapp/defconfig'
-
In terminal, go to 'nuttx/tools' and run the following command to tell the Makefile to use 'nsh' example.
$ ./configure.sh <board_name>/nsh -
Switch back to 'nuttx' directory and run 'make' but with the parameters as below to choose the required toolchain.
$ make CONFIG_ARMV7M_TOOLCHAIN_CODESOURCERYL=y
       CONFIG_ARMV7M_TOOLCHAIN_BUILDROOT=n
Subscribe to:
Posts (Atom)