Showing posts with label GNU. Show all posts

March 18, 2016

Bringing Wi-Fi Access Point Feature on your embedded board running GNU/Linux

Before reading through this article, to build and install GNU/Linux on embedded board, read through this link.

To bring WiFi client feature on your embedded board, read through this link.
----

Follow these simple steps below to bring your board as AP.
  1. Install necessary tools
    Install hostapd and dnsmasq necessary for an Access Point.
    # apt-get install hostapd dnsmasq --no-install-recommends
  2. Configure network interface
    Add or modify /etc/network/interface to contain the following.
    # cat /etc/network/interface
    auto lo wlan0
    iface lo inet loopback
    allow-hotplug eth0
    iface eth0 inet dhcp
    
    iface wlan0 inet static
    address 192.168.1.1
    network 192.168.1.0
    netmask 255.255.255.0
    allow-hotplug wlan0
    The above file says how our system get connected through eth0, wlan0 and lo. Check man page of interfaces for more details.
  3. Configure hostapd
    # cat /etc/default/hostapd
    DAEMON_CONF="/etc/hostapd/hostapd.conf"
    DAEMON_OPTS="-dd"
    # cat /etc/hostapd/hostapd.conf
    interface=wlan0
    driver=nl80211
    ssid=zilogic
    channel=1
  4. Configure dnsmasq with Client IP range
    # cat /etc/dnsmasq.conf
    
    interface=wlan0
    dhcp-range=192.168.1.10,192.168.1.100,12h
    dhcp-option=3,192.168.1.1
  5. Start hostapd and dnsmasq services.
    # service hostapd start
    # service dnsmasq start

Note: Now, you can try Raspberry Pi 3 that comes with WiFi and Bluetooth on-board for IoT applications.

More Reading

  1. What is the significance of firmware-atheros package?
  2. What is the significance of wireless-tools utility?
  3. What is iw and iwconfig? How do they differ?
  4. What is wpa_supplicant? How to connect to an encrypted connection?
  5. What is Wireless Extensions(WE)?
  6. What are nl80211 and cfg80211 and how do they differ from WE?
  7. What is Bridging in network connections? 
Bringing Wi-Fi Client Feature on your Embedded board running GNU/Linux

To prepare your embedded board with GNU/Linux running on it, read through this link.

To bring Wi-Fi  Access Point feature, read through this link.
----

To bring Wi-Fi client feature with the given NIC on your Embedded board running Linux, we may need
  1. Device driver for the given NIC enabled in the Kernel.
  2. Some HAL layer firmware, if required by the device driver. (Ref. ath9k_htc firmware - github.com)
  3. Certain utilities to configure and manage Wi-Fi.
    (iw, ip, iwconfig, wpa_passphrase, wpa_supplicant, firmware-atheros)

Installing custom packages

You may require some software utilities like, iwconfig, iw, etc., which may be required to solve your purpose. To install them there are the following possibilities.
  1. Download .deb packages of required utilities to a USB Stick or to the SD Card and install them using dpkg with -i option. But, we have to know all the dependencies for evey package you install and have them downloaded and installed prior to installing the main package.
  2. Include the packages while building the rootfs.
  3. Connect to internet through any possible interface available (ethernet, wlan) and using apt-get install them from your favorite repository. But, your board should have any such interface enabled and available for use.
  4. Use chroot on your host Linux System to change from the host’s rootfs to the SD Cards rootfs/(target fs). This method is followed in this case.

Installing custom packages using chroot

  • This requires super user access. VirtualBox together with Vagrant can be used to get super user access by normal user.
  • Also, chroot will work only if the target architecture is same as that of the host.
    1. When configuring kernel during compilation, enable support for ath9k_htc under device drivers in menuconfig. ath9k_htc is a device driver specific to atheros AR9271 which is the chipset used in our given NIC (TP-Link TL-WN722N).
    2. qemu-arm-static is a binary that can be installed in host and copied to target file system. This is used as an interpreter to run arm binaries of target file system(SD Card rootfs/). This will fix the architecture issue while using chroot.
      $ sudo apt-get install binfmt-support qemu-user-static
      $ cp /usr/bin/qemu-arm-static /home/user/rootfs/usr/bin
      Here, SD Card is mounted at /home/user/. The option binfmt-support says the binfmt_misc kernel module to use qemu-arm-static as the interpreter to execute arm binaries.
    3. Mount proc/ and sys/
      $ cd rootfs
      $ sudo mount -t proc none proc/
      $ sudo mount -t sysfs sysfs sys/
      $ sudo mount -o bind /dev dev/
    4. Change rootfs (need to be super user to do this)
      $ sudo chroot rootfs/
      root@emdebian:/#
    5. Update list and install packages (firmware-atheros, wireless-tools, wpasupplicant, wireless-tools, iw, kmod) and then exit and unmount proc, sys and dev. firmware-atheros is required for our case but not mandatory for all the atheros devices[3].
      # apt-get update
      # apt-get install firmware-atheros wpasupplicant wireless-tools iw kmod
      # exit
      $ unmount /rootfs/proc/
      $ unmount /rootfs/sys/
      Unmount the SD Card from the PC and connect to the board and boot it. In SAMA5D3_Xplained board, a dedicated DEBUG console is provided which can be used to connect to system terminal through a USB-Serial converter. After the system boots up and logged in, plug the NIC in the USB port. The device should be automatically detected and will be ready to use.
    6. Enable wlan0
      # ifconfig           /* To check if wlan inteface is listed */
      # ifconfig wlan0 up
      The second command will enable the default WLAN interface wlan0. Now the interface will be up and ready to use.

Connecting to an open network as Client

  1. Connecting to an open network is simple. It can be achieved using the iwconfig utility.
    # iwconfig dev wlan0 connect <SSID>
    You can also try iw.
  2. Get IP assigned from AP
    # dhclient wlan0
    You can check -r option for dhclient to release the current IP lease when necessary.

More Reading

  1. What is the significance of firmware-atheros package?
  2. What is the significance of wireless-tools utility?
  3. What is iw and iwconfig? How do they differ?
  4. What is wpa_supplicant[4]? How to connect to an encrypted connection?
  5. What is Wireless Extensions(WE)?
  6. What are nl80211 and cfg80211 and how do they differ from WE?
  7. What is Bridging in network connections?

Build and Install Linux for ARM Cortex-A5 based embedded board

For this present article, we use SAMA5d3_Xplained board based on ATSAMA5D36 (ARM based MPU). But, the same step follows for any other hardware.

This article aims to introduce on bringing up SAMA5D3_Xplained board as a Linux System.

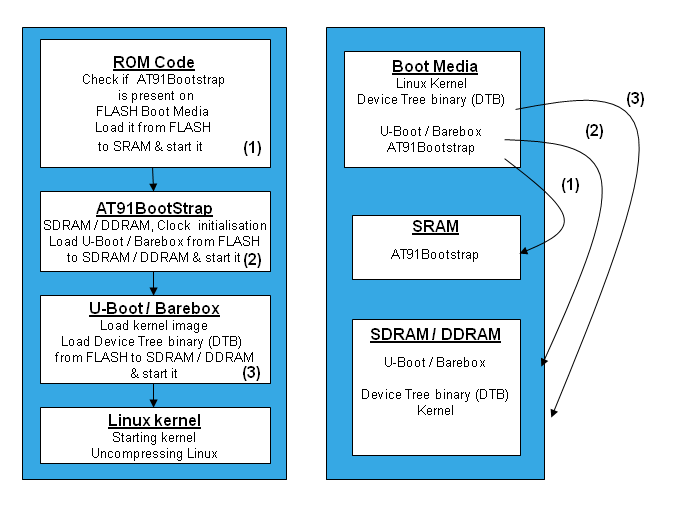
Before we start, we need to understand the boot sequence to know what should be done (Ref. Getting Started - at91.com)

Boot Sequence - at91.com
Boot Sequence (Source: at91.com)
The above image will show you three levels of bootloaders which are optional based on whether we implement simple firmware or OS.

Step:1 Prepare the necessary objects
  1. Bootstrap image
  2. Kernel Image
  3. Kernel modules
  4. Device tree file
  5. Rootfs Image 

Note:
arm-linux-gnueabi- toolchain required to build the image, can be downloaded form release.linaro.org and add path to gcc-linaro_<version>_arm-linux-gnueabi/bin directory.

$ export PATH=~/gcc-linaro-4.9-2014.11-x86_64_arm-linux-gnueabi/bin/:$PATH

To permanently add the path to the environment, add the above command to .bashrc file.

Building Bootstrap Image

  1. Clone/Download at91bootstrap source from linux4sam/at91bootstrap git repository.
  2. Configure the source with the default configuration for SD Card boot. You can find a number of default configurations for different boot media at ./board/sama5d3xek/ directory.
    $ cd at91bootstrap/
    $ make mrproper
    $ make sama5d3_xplainedsd_linux_image_dt_defconfig 
    Note:
    nf- NandFlash, sd - MMC Card, df - SerialFlash, linux - linux kernel, android - android kernel, uboot - u-boot, dt - device tree binary (dtb). (Ref. AT91Bootstrap - at91.com)

  3. Compile the at91bootstrap
    $ make CROSS_COMPILE=arm-linux-gnueabi-
    The resulting binary will be created at ./binaries/ with the name sama5d3_xplained……bin .

Building Kernel Image, Device Tree (.dtb) and Kernel Modules

The Kernel Image, Device Tree Binary and Kernel Modules are all built form Kernel Source with different options.
  1. Get Kernel Source either from kernel.org or linux4sam/linux-ar91 git repository.
  2. Configure the build with default configuration.
    $ cd linux-at91
    $ make ARCH=arm CROSS_COMPILE=arm-linux-gnueabi- sama5_defconfig
    Note: More default configurations for various standard boards can be found at arch/arm/configs/. Equivalently, you can also copy the desired configuration file from this directory to root directory with file name '.config' and run make defconfig.
  3. For any changes needed in the configuration, configure using menuconfig
    $ make ARCH=arm CROSS_COMPILE=arm-linux-gnueabi- menuconfig
  4. Compile for Kernel Image
    $ make ARCH=arm CROSS_COMPILE=arm-linux-gnueabi- zImage
  5. Compile for Device Tree Binary(.dtb)
    $ make ARCH=arm CROSS_COMPILE=arm-linux-gnueabi- dtbs
  6. Compile for Kernel Modules
    $ make ARCH=arm CROSS_COMPILE=arm-linux-gnueabi- modules
    The images will be created at arch/arm/boot/.

Building Rootfs

There are several Roofs build systems available such as Yocto, Buildroot, Busybox, Multistrap, etc.,
For our convenience, we can get the archived pre-built custom Rootfs from shark/zdrive. Other sources can also be found online(sborut.wordpress.com, Dropbox). But, for ARM architecture.

Preparing SD/MMC Card

In SD Card, two partitions are to be created.
  • First partition (FAT32)boot/ ⇒ required to move the boot images(bootstrap, kernel image and device tree binary).
  • Second partition (EXT4)rootfs/ ⇒ for the root file system requied by the kernel to run.
Note:
fdisks is a command-line tool for creating and managing partitions. mkfs is another command-line tool to format paritions to required file system. Need to be super user to use this tool.
  1. After the SD Card is ready with the required partitions say by name, boot and rootfs, copy the bootstrap image, kernel image, dtb to boot/ as follows.
    $ at91bootstrap/binaries/sama5d3_xplained-sdcardboot-linux-image-dt-3.8.bin  /media/user/boot/boot.bin
    $ cp linux-at91/arch/arm/boot/zImage /media/user/boot/image
    $ cp linux-at91/arch/arm/boot/dts/at91-sama5d3_xplained.dtb /media/user/boot/
  2. Untar the downloaded rootfs archive to the second partition rootfs
    $ tar -xvf  rootfs-armel-wheezy.tar.xz -c /media/user/rootfs
  3. Install the Kernel Modules into rootfs
    ~/linux-at91 $ make modules_install ARCH=arm CROSS_COMPILE=arm-linux-gnueabi- INSTALL_MOD_PATH=/media/user/rootfs
    Now, your SD Card is ready with the necessary components to run Linux on SAMA5D3 Xplained board.

Bringing Wi-Fi Client Feature

To bring Wi-Fi client feature with the given NIC, we may need
  1. Device driver for the given NIC enabled in the Kernel.
  2. Some HAL layer firmware, if required by the device driver. (Ref. ath9k_htc firmware - github.com)
  3. Certain utilities to configure and manage Wi-Fi.
    (iw, ip, iwconfig, wpa_passphrase, wpa_supplicant, firmware-atheros)
  4. Read on through this link to bring WiFi Client feature.

December 17, 2015

Etags - Source code navigation tool for Emacs

Why do you need etags? 
  • You would have come across situation where we need to traverse through pre-written source codes written in C, C++, Python, etc.,
  • You might have come across difficulties in looking for function definitions that could be located anywhere among the included header files that are distributed across different directories.
  • etags come to the rescue.
What is etags?
  • When we use IDEs like Keil, MPLAB, etc., simply clicking on function call can take you to the function definition.
  • etags provides you with similar functionality when using emacs as your editing tool.
  • etags comes as part of emacs and hence no need to install it and you can directly jump in. Check man page for 'etags' to know more.
Usage 
  • Open terminal and move to the parent directory of the source code where you want the TAGS file to be created.
$ cd /location/of/parent/directory/
  • Type in the below code to create the tags table in a file with default name 'TAGS' in the current directory. The name can be changed using the --output=filename option. The ''-'' as the filename prints the table to the standard output.
$ find . -regex ".*\.c\|.*\.h" -print | etags -
to create tags table for selected files alone, you can simply use
$ etags filenames...
Check your directory for the TAGS file created. It might take some time to create the file depending on the depth of your source.

Now you are done with configuration. Lets see how to use it to traverse across source code.

  1. Open any source file under your source directory using emacs.
  2. Move your text cursor over a function call.
  3. Type M-. (Alt+.) and click enter. You will be prompted with 'Find tag (default <function name>):'.
  4. Click <Enter>
  5. Now you will get a prompt 'Visit tags table (default TAGS):'. It means, you need to provide the location to the directory where the TAGS file is located. (This is a one time prompt for every emacs session.)
  6. Enter the location to your TAGS file and click enter.
  7. 'Mark set' will be displayed and you will be taken to the definition of the function. After reading through the definition, at any point you can type M-* (Alt+Shift+8) to return back where you started.

WARNING: Use (Alt+Shift+8) in the default keyboard. Don't use number pads.

NOTE: This procedure will hold good for traversing to header files and macros as well. Also, you can check tutorial on ctags.

References
  1. Creating tags table -gnu.org
  2. etags -gnu.org
  3. Creating etags file -commandlinefu.com
  4. ctags tutorial -cs.washington.edu (For tutorial on ctags)

Receive all updates via Facebook. Just Click the Like Button Below

You can also receive Free Email Updates:

dgpride - Study Zone - Free Books - Tamil Lyrics

Copyright © 2008 -2012 dgpride. All rights reserved.

Subject/Topics

2 Marks (26) 8051 (1) AC Machines (7) Animations (1) Anna University Chennai (31) Arduino (4) ARM (3) Audio (1) Basic C Concepts (8) Basic Electronics (13) Basic principles (9) Book list (1) CAD (1) Chemical (2) Circuit theory (6) Civil (2) Cloud Computing (1) Communication (4) Competitive exams (2) Computer Architecture (4) Control system and components (9) CSE (40) Curriculum (4) DC Machines (9) Did you know (14) Digital (13) DLC (4) Documentation (1) DSP (1) EC 2201 (3) ECE (45) EDC (1) EEE (34) EIE (63) Electrical (35) Electronics (43) Electroplating (2) Emacs (1) Embedded basics (19) Embedded C Programming (19) Embedded Linux (5) Embedded System (22) Engineering basics (15) Environmental Science (1) Fibre Optics (1) Filters (2) FPGA (1) GATE (3) General (7) GNU (4) Handwritten (1) Hobbyist (15) How to (8) HTML (3) Humanities (2) IC Engines (7) ICE (5) Industrial Electronics (10) Industrial Instrumentatin (2) industrial process (2) Instrumentation (21) IoT (2) IT (2) Laboratory Manuals (17) LabVIEW (2) Lesson notes (2) LIC (2) Links (9) Linux (8) Magnetics (1) Management (1) Mechanical (5) Mechatronics (9) Microcontrollers (14) Microprocessors (9) Microsoft (1) Motivation (1) Must Know (11) Networks (1) NuttX (1) Objective type (1) Open Source (1) Opportunities (7) Oscillators (2) Part Time (1) Physics (1) Post Graduation (1) Power Electronics (12) Power Plant Engineering (2) Power Supplies (2) Previous GATE Papers (1) Process Control (2) Project (4) Protocol (1) R2008 (11) R2009 (1) R2013 (1) Recruitment (2) Research (2) Robotics (9) RTOS (3) Signal Processing (8) Signals and Systems (4) SMPS (1) Software tutorial (4) Stepper Motor (2) Syllabus (5) Texas Instruments (2) Thermodynamics (2) Training and Placement (6) Transducer Engineering (2) Transformer (2) Transmission (1) Tutorials (48) Two Marks (26) U-Boot (1) University Question Papers (16) Verilog (1) Video (4) Virtual Instrumentation (3) Visual Basic (21) VLSI (11) Web designing (4) Wi-Fi (3) Wireless (6)